Roof


Roof maintenance
- Inspect your roof annually for signs of deterioration and damage, such as curling, worn shingles, broken tiles and excessive moss (moss may be managed with cleaning). Inspections can be coordinated with regular roof and gutter cleaning.
- Look carefully and regularly at known ‘problem areas’, such as chimneys, penetrations (such as skylights and roof vents), roof valleys, previously repaired areas, roof areas that concentrate drainage onto lower roofs, and areas where roofing meets another material. These areas often need more frequent spot repairs.
- If you have a green roof, be sure to follow proper maintenance and upkeep specific to the kinds of plants that are planted.
- For a new roof over a vaulted ceiling, consider installing rigid insulation on top of the sheathing.
Sheathing
Sheathing is attached to the roof’s framing. Homes built prior to 1950 often have tongue-and-groove boards for sheathing, while newer homes have plywood or oriented strand board (OSB) sheathing. Underlayment is under the roofing material and protects the sheathing from moisture damage.
- When replacing a roof, leave the old sheathing in place if it is in good condition. In some cases, a layer of plywood or OSB can be laid on top of tongue-and-groove sheathing, a technique called “over-sheathing.” But the added weight on the roof should be approved by a professional roofer and your code official.
- Consider purchasing local, reclaimed or FSC certified wood sheathing in your roofing project.
Underlayment
Underlayment is under the roofing material and protects the sheathing from moisture damage. Membranes are often used for additional protection beneath the underlayment in areas prone to leaks. Standard underlayment material is roofing felt, which is also known as “tar paper” or “builder’s paper.” Historically made from paper fibers saturated with asphalt, today’s roofing felt often includes fiberglass to resist tearing.
Flashing and drip edges
- Drip edges are installed along the roof’s perimeter to keep water from tracking under the eaves where it can damage the roof and siding. The material choices are similar to flashing, with aluminum being the most readily available and ecologically-friendly option.
- Look for innovative products that combine a drip edge with a roof vent.
Roofing materials
Planning
- If you have a low-slope roof, you may be able to install a vegetated roof or green roof. Green roofs, which have a higher initial cost, reduce rainwater runoff and heat gain and lower roof maintenance costs. Green roofs offer some of the same benefits as adding more landscaping. Talk with professionals, including a structural engineer, to determine if your home is right for a vegetated roof. Be sure to understand maintenance requirements before selecting a green roof, and once complete.
- If your house does not have eaves, it is especially prone to having wet walls. Homes dating from the 1940’s were often built without eaves, allowing rain to easily pass behind the gutter and drip directly into the wall cavity, causing mold and mildew and making the home harder to heat. If you are reroofing, ask your contractor about adding eaves or overhangs and whether a raised heel detail can be framed over the outside walls – raised heels create room for installing more insulation.
- Consider pre-wiring for solar energy when remodeling or changing your roofing material if you are interested in future installation of solar.
Roofing Materials Choices
- Look for recycled-content roofing materials, which may be available in metal, asphalt shingle or fiber cement products.
- Select light-colored materials to avoid unwanted heat gain.
- Seek alternatives to copper and zinc-coated roofing materials, as they leach pollutants into rainwater.
- Seek alternatives to products with built-in moss inhibitors as they may contain toxins.
- When choosing a roofing material, consider longevity and maintenance requirements in addition to appearance.
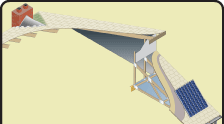
- Add insulation to your roof if it is part of a cathedral or vaulted ceiling. Remove the existing shingles. Secure two staggered layers of rigid foam insulation on the sheathing. Install 5/8” plywood on top and secure (with long screws) into the roof rafters. Then install the new roof.
Gutters and downspouts
- Seek alternatives to unpainted galvanized gutters, which leach zinc into rainwater and rust over time.
- Choose painted aluminum gutters, as they will not affect water quality. Avoid PVC gutters, which leach additives that harm fish and are less durable than metal
- Look for seamless aluminum products from services that fabricate gutters on-site to the dimensions of your home; this will reduce the likelihood of leaks.
- Stand directly below your gutter and look up. Check to make sure there are no gaps between the roof edge and the gutter.
Insulation
Most homes in the U.S. built before 1970 are poorly insulated, if at all. Modern energy codes require minimum levels of insulation, but it’s possible you could do more to save money on your energy bill. Even with progressive energy codes, some energy-efficient building details are overlooked in many new homes.
Insulation Levels and Types
- Some houses may contain vermiculite insulation, which looks like shiny brown rocks, roughly the size of peas. This insulation potentially contains asbestos and could be a health hazard if disturbed and inhaled. Sample the vermiculate and send it to a lab for asbestos testing.
- Consider increasing the amount of insulation in your home with a blown-in insulating product. Blown-in insulation can be cellulose, foam, fiberglass or rockwool.
- Insulation products are rated by their resistance to heat flow, called R-Value. The higher the R-Value number, the more effective the insulation and the lower your energy bills.
- Use cellulose rather than fiberglass for insulation. Fiberglass has eight times the embodied energy as cellulose. Cellulose is made from 80 percent recycled newspapers and cardboard. The other 20 percent is borate, which resists mold growth, repels insects and retards fire. Avoid cellulose insulation with any ammonia-based additives.
- If you choose to use fiberglass be sure to select a formaldehyde-free product. Major brand formulations are also available with more than 50% recycled content.
Installation Tips
- Take precautions when insulating on top of, or near, existing wiring, fixtures, chimneys and flue pipes. Your permitting jurisdiction may offer guidance on this topic. If your house has any “knob and tube” electrical wiring, have a licensed electrician evaluate its condition and see whether it is safe to add insulation on top of it.
- Weatherstrip and insulate attic access hatches with rigid board insulation.
- Install insulation baffles at soffit vents before insulating – this protects insulation from degradation and reductions in R-value though wind washing. Wind washing leads to cold spots and in extreme cases can cause moisture problems.
- Make insulating the attic the last thing you do, after all other air sealing or other work that involves attic access. Once insulation is installed, do not disturb it, in order to ensure proper performance.
Air Sealing Tips
- Air seal around any penetration in the ceiling such as IC/AT rated can lights, fans, and electrical and plumbing penetrations. Air seal the small gap between ceiling drywall and top plates.
- Recessed can lights are often a major source of air leakage and not all can have insulation against them. If you’re looking to insulate an attic and have recessed can lights, look at the label on the inside of the can. Look for “IC Rated”. If the can is not IC Rated, you will need to have heat-resistant boxes built around every recessed light in the attic before adding insulation. If they are IC rated, insulation can be applied directly over them.
- Attic exhaust fans should not be installed, even solar powered attic fans, as they depressurize the house and drive infiltration from crawlspaces and garages, which can be a health hazard. High levels of properly installed insulation typically provide a sufficient thermal barrier.
- Sheet metal barriers should be installed between insulation and hot surfaces such as chimneys and other combustion appliance vents. Air sealing at these locations can be done with special caulks.
Solar and wind energy
Planning
- Consult a home performance contractor and/or energy auditor to maximize reductions in your overall energy use, before evaluating renewable energy systems.
- Evaluate whether investing in a renewable energy system is practical in terms of your project goals, payback, property values, structural conditions and other considerations. Account for the combination of costs and benefits of permitting and installation, but also in any local, utility, state or federal incentives.
- Hire a solar installation company or design professional to evaluate and model your home, including your existing roof system, for permitting.
- Ask your utility company about permits, inter-tie issues and net metering. Investigate how rate plans for your home may change with the addition of a renewable energy system.
- Pre-wire for solar energy when remodeling or changing your roofing material if you cannot afford to install solar right away.
Specific Systems
- Consider a solar hot water system for your domestic hot water.
- Current wind technologies that attach to buildings are typically not cost effective.
Installation
- Find a knowledgeable, experienced installer who provides field-tested and reliable systems.
- Do not assume you have to install on your roof or attached to a building; some systems will work better attached to ground racks, poles, etc.
Additional resources
- Green Home Remodeling Guide for Roofing Download PDF
1.3 MB – from the King County Solid Waste Division
Provides in-depth eco-friendly tips for your roof remodeling project – with information on solar panels, shingle selection, and more
Energy
- Puget Sound Energy's Renewable Energy Advantage Program (REAP) external link
A voluntary, financial incentive program that benefits customers who generate their own renewable power and connect to their electricity grid - Do It Yourself Home Energy Audit Guide Download PDF 3.6 MB
- Seattle’s Homewise: Weatherization Services for low-income households external link
- King County Housing Authority’s Weatherization Services for low-income households external link – outside City of Seattle
- Puget Sound Energy’s energy efficiency rebates external link
- Puget Sound Energy Single Family New Construction Incentives external link
- Seattle City Light’s Multifamily Weatherization and Lighting Rebates external link
- Database of State Incentives for Renewables & Efficiency – Washington Residential Incentives external link
- Weatherization from the U.S. Department of Energy external link
Provides information on energy–efficient insulation, and how to fix air leakages in your home - Solar Technologies Program external link
Provides information on cost effective solar energy technologies including photovoltaics and system integration programs - Solar Washington external link
A local non-profit organization comprised of several solar energy stakeholders - Washington State University Energy Program external link
Provides information on the most cutting-edge research on energy - Puget Sound Energy's Renewable Energy Advantage Program (REAP) external link
A voluntary, financial incentive program that benefits customers who generate their own renewable power and connect to their electricity grid - A Homebuilder’s Guide to Going Solar – U.S. Department of Energy external link
Provides information on incorporating solar technologies
Other
- EcoBusiness Environmental Directory external link
Provides an extensive list of links to companies that specialize in eco-friendly products for any home remodeling project - Household Hazardous Waste Collection Options – from the King County Solid Waste Division
Provides information on how to best dispose of household hazardous waste
Related information
|